
Hi Folks:
This started out as an idea for a blog post, evolved into a one-hour presentation for our local camera group, and now I’ll try to compress that into a blog post. We’ll see how it goes.
There are several questions to begin with, the first of which is: why do this? The answer is to extend or expand the capabilities of your camera, no matter the camera. There are at least five different reasons that I know of to combine multiple exposures into one image. These are two of them. The second question is, why cell phones? This post doesn’t only involve cell phones, but cell phones are ubiquitous. Some people only make images with their phones, despite the technical challenges, but the bottom line is that it depends on how you’re planning to use your images.

 On the left is an image made with my Sony A7R III, 42MP camera. On the right is a similar image, made with my Samsung Galaxy S6, 16 MP phone camera (much smaller sensor). Either is fine for on-screen sharing, but if we zoom in the difference in the quality of the images is obvious.
HDR
 HDR is an acronym for High Dynamic Range. Sometimes people talk about an HDR look, pseudo-HDR or making an HDR from one image. When I hear things like that, I know that a) these people don’t know what they’re talking about and b) what they’re talking about is tonemapping. Remember that digital images aren’t pictures, they’re collections of information. We can take that digital information and make it into something that looks like an image. The more information we have the more we can twist and bend that information without tearing it apart.
 We’re not going to get too much into 8-bit vs. 16-bit vs. 32-bit or 16-bit floating point: There are plenty of resources for that on the ‘net.
 This is another example of tonemapping. Twelve images were used to make this to show water movement, but all 12 were at the same exposure. The resulting composite was then processed to give it that slightly edgy look that people usually associate with HDR. For more on HDR, visit: Why Use HDR?
 This is an example of three images combined into an HDR image. Most HDR images are made from 3 or 5 base images, either 1 or 2 stops apart. How do you choose? It depends on the scene and it also depends on your camera. Beginning with our base images, we use software that chooses pixel by pixel the best option from each of the frames to make the composite. On the left are the single exposures. On the right is a 3-image bracketed exposure that’s been pushed around a little in Lightroom.

 Because we’re talking about information, there can be other advantages to HDR as well. The image on the left is a single exposure. The image on the right is a 3-image HDR. Overall, they look pretty much the same, but if you zoom in, you can see that the image on the right has much less noise. These two images were processed the same. You could use noise reduction to remove some of the noise on the left, but you’d lose detail in the process.
Your camera may or may not have exposure bracketing built in. Most do. Most cell phones don’t. In Auto mode my Samsung phone software does have an HDR mode and it does capture 3 images and blend them together. But I can’t tell you anything more than that because it doesn’t tell me anything more than that. Depending on what you want to do, that may be all you need. There are some caveats, but we’ll get to them later.
In Professional mode, my Samsung phone software does have exposure compensation but I’d have to make one image, change exposure, line up the camera again, make another image: Therefore, in order to capture multiple exposures, we’re going to have to resort to other software. For Android phones, Camera FV-5 is among the most advanced phone apps I know. Manual Camera is another one. One feature of Camera FV-5 is exposure bracketing. I can set it to make 1, 3 or 5 exposures, and set the exposure variation between each shot. It takes time to make the exposures so you need steady hands or a tripod. NB: Exposure compensation can interfere with bracketing. If I set compensation to -1 and try to do 5 step bracketing at +/-1, it’s going to try to reach for -3 and can’t. I’m sure there are similar apps for iPhones.
The HDR app I use the most is Pro HDR Camera. It’s available for both Android and for iPhone. There are actually 2 iPhone versions, depending on which OS you’re running.
 This is the main screen for Pro HDR camera. At the top you can set it to Auto mode – where it determines the over/under exposure settings, or Manual – where you can set the values manually by moving the sliders. NB: Pro HDR Camera uses a 4:3 aspect ratio, not 16:9.
 After capturing the images, the app creates a composite that you can then modify. Sometimes it does a fairly decent job, but it’s a phone, not a computer. Sometimes you can get really bad haloing. What I like best is that it also provides the three base images separately that I can move to my computer for combining/processing.
Once you’ve made your exposures, the next step is to combine them into one composite HDR image:
-
If you have Lightroom 5(?) or later, it has its own HDR routine. If you use Capture One instead of Lr, it doesn’t have a built-in routine, nor does it have any specific HDR plugins, but you can export the images and combine them in other software. If you use ACDSee or OnOne or DxO or something else, I don’t know the full capabilities of all of them.
-
Lr/Enfuse is a plugin for Lr for making image composites that’s been around for a very long time – long before Lr had its own routine. It’s donationware so you decide how much it’s worth to you. Lr/Enfuse does not create a 32-bit output file so some don’t consider it true HDR software, but if you create stacks of images in Lr, Lr/Enfuse has a batch mode that will let you select all of your stacks and process them consecutively.
-
If you have Photoshop it has a built-in HDR stacking module. I don’t use Ps; I use Affinity Photo. It works similarly.
-
Photomatix is probably the most well-known HDR software. There’s a standalone version, or for $30 or so you can buy a plugin that works from within Lr.
-
A long time ago NIK software made a suite of software including HDR Efex Pro. Google bought NIK and made the software available for free, and then Google sold the software to DxO. They’ve upgraded it, but it’s no longer free. You can still find the free version if you look for it. HDR Efex Pro can be used standalone or as a plugin so if you use C1, OnOne or whatever you can export your images and combine them.
-
GIMP is an open-source pixel editor, like Ps or Affinity, but free. There are a variety of plugins for GIMP, also free. I haven’t tried it yet.
 This is the same image, as a single exposure and as an HDR combined 5 different ways. These are all unprocessed; depending on your choice of software, you’ll get different results to begin with.
 Using Pro HDR Camera in auto mode generated these three images.
 This is the same three images, combined five different ways. Two of the images were quite dark so I used the Auto feature in Lr to process them. From here you can get into processing/ tonemapping, and different software have different tools for that.
Panoramas
 When talking about panoramas in photography we need to separate two terms.
 A panorama is a composite (usually) made from more than one image. A panoramic image is one that’s cropped to give a broad view. They’re not necessarily the same.
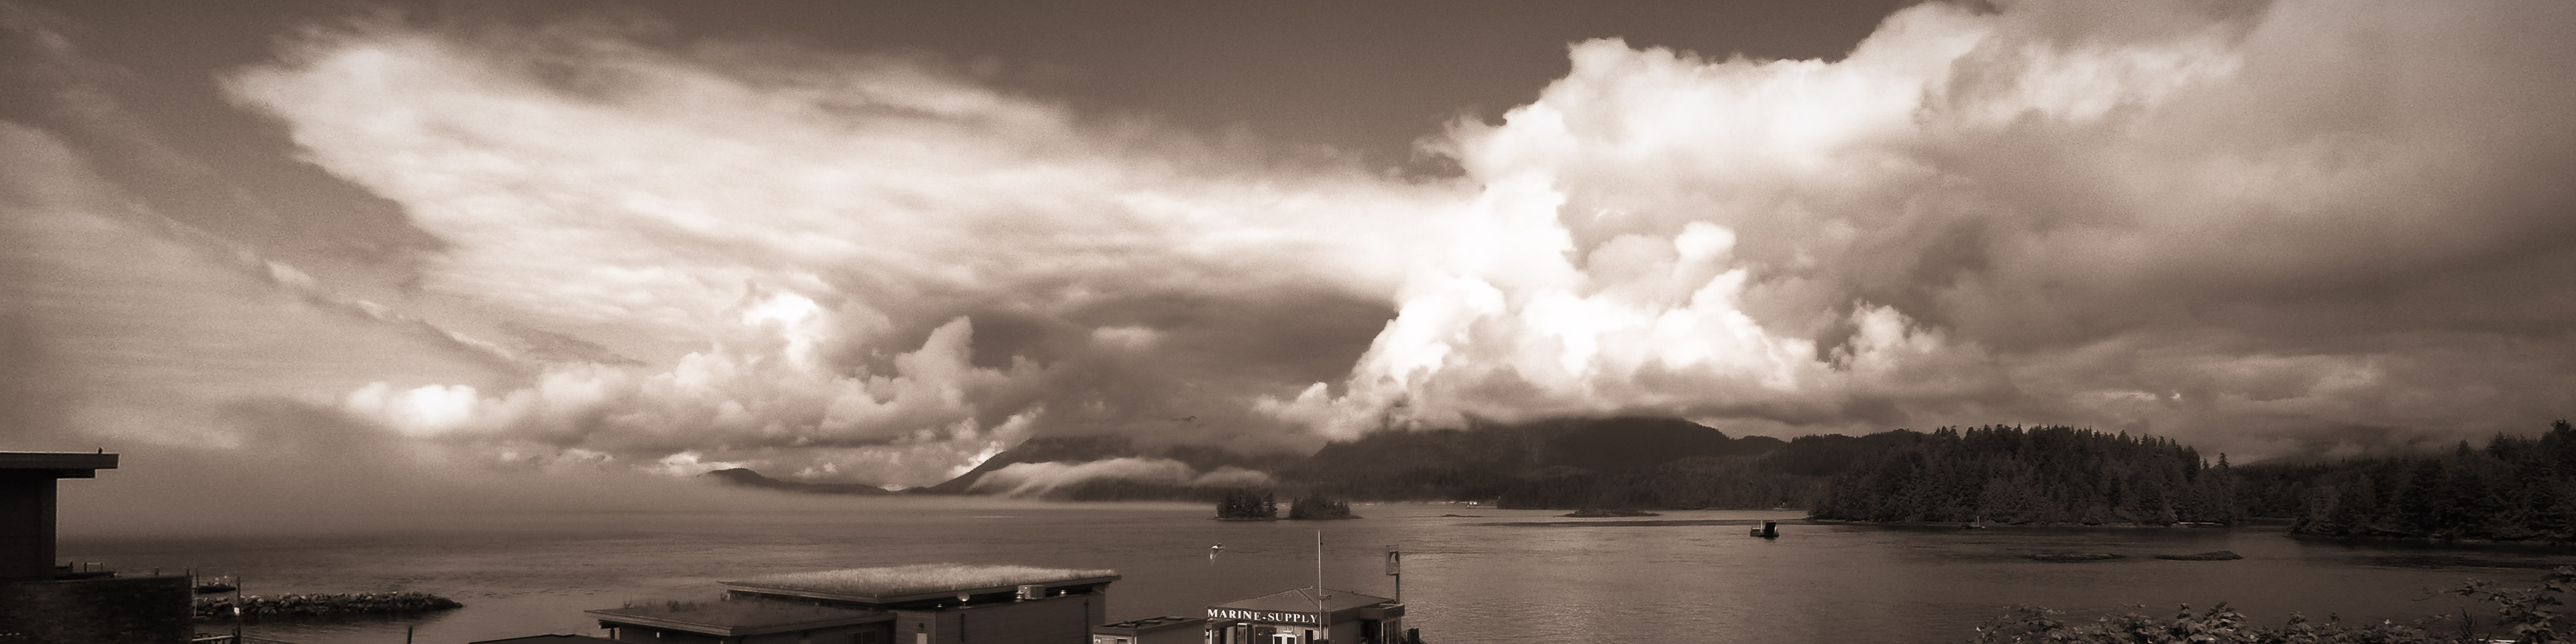
 Not all panoramas are panoramic. This image of Mill Hill and Esquimalt naval base was composed of 8 images made with my A7R III.
 Most if not all cell phones have a built-in swipe panorama feature, but the image sizes tend to be small and because of the wide-angle lens there’s often a lot of barrel distortion, especially with wide panoramas. There’s some banding present in the lower image because of shooting into the sun and exposure variations but the perspective is much better.
How to make a panorama.
 We start with a wide scene – could be landscape, cityscape or even vertical.
 We look through the viewfinder, click the shutter and get: this.
 So, what we do instead is to make a series of images, each one overlapping the previous ones by about 30% (rough value – it depends on the scene and the camera resolution).
 We now have five overlapping images that we need to combine together. The software looks for the same elements in more than one frame and creates control points based on those features. NB: We’re trying to compress a 3-dimensional space onto a flat 2-dimensional frame and we’re adding in perspective shift and camera movements so we need to twist and bend the data to fit.
 Voilà . Our completed panorama. NB: Depending on your software, one can use different projections to compress your three-dimensional scene into a two-dimensional image. Lightroom has three projections: Planar (flat), Cylindrical and Spherical. Other software can have 10 or more different projections. Which one you use depends in part on the scene, camera movement and aesthetic effect.
 There are a couple of reasons to make panoramas. One is to make an image of something larger than will fit in the frame. This is an image of the junction between Crystal Cove and MacKenzie Beach in Tofino, BC. I backed up as far as I could w/o getting wet.
 I moved closer and made six images instead. Again, you need software to combine your images.
-
Lr has a built-in panorama module. Capture One doesn’t, but you can use standalone software. Not sure about ACDSee, DxO, OnOne:
-
Again, Ps or Affinity have panorama features.
-
GIMP also has free plugins for panoramas
-
Hugin is a very powerful open-source program. Its interface is not quite as user friendly for beginners, however.
-
If you’re running Windows, Microsoft has a program called ICE – Image Composite Editor. It’s also free, and even allows you to make panoramas from videos.
-
PTGui is probably the most well-known panorama software, but it’s not cheap.
-
My favourite panorama program is called Autopano, but unfortunately the company has gone out of business. You can still buy the software from places like B&H Photo, but there’s the implied statement that since the company no longer exists there’s no warranty, upgrades:
 This is the same six images, processed five different ways. All used the same projection but you can see differences. Also note the stitching error in the two top images (top left), where there’s a break in the treeline. This happens when the data can’t be bent enough and breaks.
 And yes, one can make HDR panoramas. I actually made 18 images with my phone, not six. If you have the latest Lr you can do it all at once. Autopano and Affinity work the same way as does Ps. Not sure about the others. I have five different HDR programs and five different panorama programs, so I have 25 different ways of making combined images, but you can start with one.
 The other reason to make panoramas is to increase resolution. This is a 100% view of the previous image. The final image is a little over 13K pixels wide, which means that at 300dpi you can make a print 3½ feet wide. Not bad for a cell phone.
Caveats – HDR
This is an overview, not an in-depth exploration of HDRs or panoramas, but there are a few things to note:

 There are two types of movement when making HDR images – camera movement and subject movement. Avoid both where possible. Different software has ways of dealing with subject movement, not all of them good. Most HDR programs have some sort of built-in ghost reduction to account for subject movement but you have to be judicious in its use. Lr can be pretty bad (note the gray areas above).
When making HDR composites, manage your exposure to avoid blowing out most of the scene. Make more images rather than fewer if necessary.
Most cell phones have a single aperture. For a camera, change shutter speed rather than aperture or ISO. Changing aperture changes the Depth of Field, and changing ISO can change the amount of noise produced, depending on the camera.
Caveats – Panoramas
The biggest thing to remember when making panoramas is parallax. Try holding your arm out fully in front of you, with your thumb up. Close one eye, then the other, and notice the subject matter behind your thumb and how it shifts. That’s parallax. To best make panoramas you need to rotate around the entrance pupil of the lens. Some people (incorrectly) refer to rotating around the nodal point. There are resources online that describe this. One can shoot panoramas hand-held, depending on the subject distance of the foreground. On my Laowa 12mm lens, the entrance pupil is conveniently located on the lens barrel. For serious work there are nodal heads for tripods including motorized, computer-controlled cradles. If you’re making images for a panorama with your phone, use the index finger of your other hand and place it on the edge of your phone in line with the lens of your camera. Rotate your phone around your finger.
 Where possible, use manual exposure. This isn’t always possible with your phone, depending on the app you’re using. Here the exposure varied considerably from one side of the frame to the other. Manual exposure and/or bracketing are important. Do not use polarizing filters when making panoramas as the effect of the polarizer varies depending on the angle of the filter to the sun.
Correct lens distortion in software where possible before combining images. This is especially important when using wide angle lenses as they can have both optical distortion and light fall-off in the corners.
 Here’s an example of wave movement between frames. Scenes like this are challenging to deal with.
If you want to get extreme and try to make smoke come out of your computer, consider gigapixel images: you can check out gigapixel images online. Some of them are incredible. They use computerized mounts to move the camera: https://360gigapixels.com/
 A couple of more examples to finish up. This is a Garry oak near Christmas Hill in Victoria. Significant post-processing, beginning with images from a 10MP camera.
 This is a different example of image stacking, neither HDR nor panorama. Images made with my phone on a tripod and Camera FV-5.
 And finally, every once in a while your computer will throw out something that makes you wonder: WHAT WERE YOU THINKING? In making the HDR on the right, the first time the software tossed out the image on the left. I’ve had other images with panoramas do weird things too. Maybe the computer was just messing with me. 🙂
Okay, that’s it for now. Go out and make some photographs!!
Hugs,
M&M