
Hi Folks:
It’s been a while since we did a Lightroom tutorial, so it must be time for another one. The Radial Filter is our focus this time; it’s the third and most recent of the three tools in Lightroom (the Adjustment Brush and the Graduated Filter being the other two) that allow you to target specific parts of the image by masking out certain areas and making adjustments to the rest. As such the Radial Filter uses the same layout and the same presets as the other two tools. Let’s get started.
 This is a lovely little spruce tree in Victoria’s Beacon Hill Park, and I really like the shape of the tree but it gets lost among its neighbours and the image is, well, boring and flat.
 The first step is to process it to taste, which for me meant converting to grayscale to highlight the form, cropping it slightly, and making some exposure adjustments. That gets us this far, but the image is still flat. I want to subtly highlight the little tree in the center without making it obvious.
 For this image we’re going to use the Radial Filter tool to do that. Essentially the Radial Filter creates an elliptical mask. To start, you place your mouse on the screen and drag out an ellipse, but there are a few tips. By default, where you place your mouse becomes the center point of the ellipse. If you want to make the beginning point one ‘corner’ of the ellipse, hold down the Alt/Opt key while dragging it out. If you want to make an exact circle, hold down the Shift key while dragging. And finally, if you hold down the Ctrl/Cmd key and double-click on the image you’ll create an ellipse that fills the entire image frame. NB: the borders of the ellipse can extend beyond the image frame but you may need to zoom out to see it/work with it.
 To some degree, where you place the ellipse to begin with doesn’t matter because you can move and resize it after placement. Clicking and dragging on the center pin of the ellipse (if you don’t see the center pin, press H) will move it. You’ll notice that the ellipse has four control handles (little white squares), and if you click and drag on one of those you can adjust that point and its opposite. NB: If you want to be able to move one control point without affecting the other, hold down the Alt/Opt key. Finally, if you place your mouse on the edge of the ellipse you’ll notice that the icon turns into a double-headed arrow. Click and drag on the edge of the ellipse and you can rotate it. As with the other two tools, pressing the O key (that’s oh, not zero) will show/ hide the mask area and pressing Shift-O will change the mask colour. If your subject and mask are both red for example, it can be hard to tell them apart. You can also adjust the feather of the mask (the transition zone) using the slider in the bottom right. The default is 50; here we’ve pulled it back to 30.
 With this image we’re going to use a vignette to darken the edges of the frame and highlight the tree a bit. Lr does have a Post Crop Vignette tool, but in this case the Radial filter has several advantages. The Post Crop Vignette tool always uses the center of the image as the basis for the vignette, and one can’t rotate it as we’ve done here. As you can see from the sliders we’ve reduced the exposure in the outside area by 1.2 stops, and we’ve further dropped the shadows, but we’re preserving the highlights to increase the contrast and provide some secondary points of interest.
 That gets us to this point, which is better but not enough. The little tree still gets a little lost. The next step is to highlight the center of the image a little.
 By putting the mouse on the center pin of the ellipse and right-clicking, we select Duplicate. Duplicating a mask creates a second filter on top of the original with the same settings as the original. The advantages are several depending on use. First, one need not create a second ellipse from scratch in the same place and with the same dimensions as the first. Having a second ellipse can augment the first, even if the sliders are set slightly differently. In this case we’re going to check the Invert Mask option in the lower right, which means that we’re now affecting the area inside rather than outside the ellipse. We’ve increased the exposure by 0.2 stops and further increased the Highlights, just a touch. We don’t want the final result to be obvious; a soft touch is best here.
 NB: Because of the non-destructive nature of Lr’s workflow, one can go back at any point and change the sliders of the mask(s). However, because duplicating a mask (Radial Filter or Graduated Filter) places the new mask directly over top of the old one, it can be a challenge accessing the underlying mask to change the settings. However, by zooming in and moving the top edit pin just a little bit to the side, the bottom pin is revealed and one can click on it to make it active instead.
 Here’s our final image – just a little different than the original. The little tree now stands out from its neighbours, but not so much that the effect is obvious.
 However, sometimes obvious can be what one wants. This is an image of our favourite tree from Victoria’s Butchart Gardens.
 Cropping and processing gets us to this point, which is nice, but not quite what I was looking for.
 I reset the crop and added a Radial Filter that bleeds light in and colour out of the edges, resulting in an image that looks like it’s emerging out of the page. Much better.
 Sometimes an image has more than one focal point, such as in the case of these two meadow death camas flowers amid a field of common camas.
 Using the Radial Filter allows me to highlight the one flower by darkening the rest of the frame, but this includes the other flower as well.
 By adding a second ellipse and using the Invert Mask option I’m able to reverse the darkening effect on the second flower. NB: I didn’t bring all of the light back to the second flower, only about 80%. This way the flower on the left still dominates and the one on the right becomes a secondary focal point.
 The Radial Filter tools was introduced in LR 5.x, I believe, but if you have Lr 6.x or an updated version of Lr CC you’ll have one further option that wasn’t available in earlier versions; the ability to use the Brush tool within the Graduated Filter or Radial Filter tools to add to or remove from the mask.
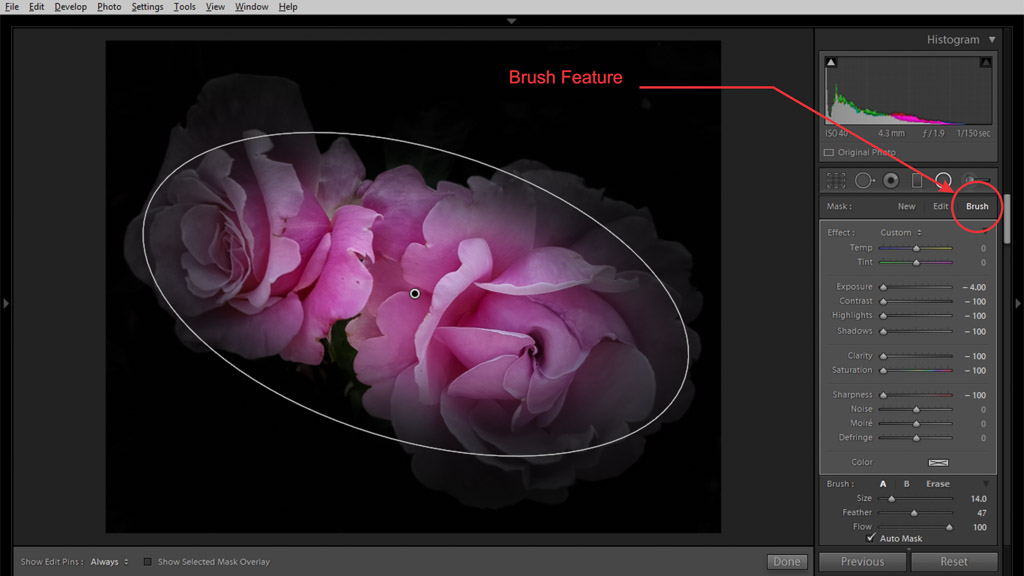 For this image we’re going to isolate the flowers from the background. We could just use the Adjustment brush for this, but the Radial Filter gives us a good start in one go. By switching to the Brush option within the Radial Filter we’re going to modify the mask created by the ellipse.
 Here we’ve change the mask colour from red to green to stand out against the pink flowers, and used a fairly wide feather to mark the background and the edges of the flowers. The sliders are set to both darken and soften the background and edges. With the previous example of the two camas flowers we could have used the Brush tool to mask the second flower, but since we wanted it to be less bright than the first we would have had to adjust the flow and paint in the amount of masking. Sometimes a second ellipse is easier.
 After our Radial Filter and some other Adjustment Brush work this is our final result. Just a little different than where we started.
We trust that gives you some ideas on how to work with the Radial Filter in Lightroom on your own work. That’s it for now; go out and make some photographs!
Hugs,
M&M
P.S. Adobe Camera Raw has the same tools and works pretty much the same way.
P.S. II, the sequel: You can find more of our posts on photography and Lightroom tutorials here, and you can find links to over 200 other sites that have Lightroom tips, tutorials and videos here.
So many beautiful photos made even more striking! Thank you for a wonderfully educational post – I had no idea that you could do ALL of this with the radial filter in Lr… I am going to hold you responsible for the hours that I will now spend with this tool, tweaking some of my nature photos – I often discard photos which are 'flat' – now I may be able to save some of them 🙂
Kumud @AjmaniK
Thank you for saying so! Photography has always been a multi-stage process, and Lr has a great suite of tools for file management, image processing and more. It all comes down to using the tools that allow you to enhance your vision. At the same time, I often find that if I'm struggling too hard to 'make' an image work, it isn't worth it. Cut and move on. 🙂
Hugs,
M&M
Wonderful article I’ve used the radial filter once or twice to experiment with it, but not being familiar with the tool, it’s been neglected in my workflow. Understanding something how it works and acts is 90% of the battle. Thanx once again!
You\’re most welcome! If you have any questions, feel free to ask away!
And thanks for dropping by our little corner of the \’net!
M&M